Valentine's Day is rapidly approaching, so it's time to proclaim your love for all the awesome people in your life. Now, you could go to the nearest big box store and pick up a store-bought card to let your loved ones know how you feel. You know the drill- sappy poems, embossed roses, pink hearts, a box of kittens. But aren't the objects of your affection so much more awesome than that? Don't they deserve something one-of-a-kind? Oh yeah they do! That's why it's time for an epic Valentine's Day DIY:
The Glittered Watercolor Valentine
These valentines are super easy to make once you know how. And I'm going to show you how in my first ever DIY craft tutorial!
What you will need:
- Glitter
- Blank cards and envelopes (or get fancy and make your own with watercolor paper)
- A wide, flat watercolor brush and a round or mop watercolor brush
- Watercolor paints
- More glitter
- Salt (Finely ground sea salt or regular table salt)
- White glue
- Additional glitter
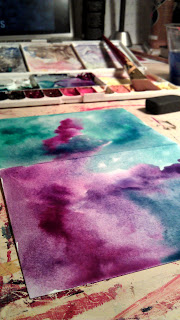
Step 1: Mix up some nice, bright colors in your watercolor palette. If you're not very experienced with watercolors, I'd advise sticking to one area of the color wheel to avoid ending up with mud. Try turquoise, green, and blue together or pinks, reds, and oranges.
Step 2: Use your flat brush to lightly cover your paper with water. You don't want to get it soaked because it will warp the paper, take forever to dry, and dilute your colors.
Step 3: The fun begins! Take one of your colors of watercolor and drip it around on the wet card. Don't cover the whole area, because you're going to go back and fill in the empty space with other colors. To achieve a more painterly effect or if your paper starts to dry, just drip a little water on the area with your brush.
Step 4: Now you could be content with your watercolor washes, and that would still look fine. But why not add some fun texture?
This technique is so ridiculously easy. I learned it from an artist I met on a studio tour when I was a young kid, and have continued to use it for about 2 decades (Who takes an elementary school kid to a fancy schmancy artist studio tour? My mom. Have I mentioned yet that my parents are awesome?)
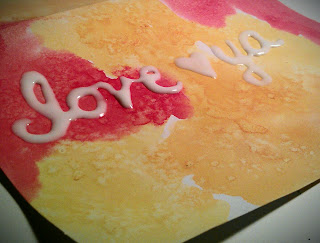
All you do is scatter some salt (go easy) over the wet puddles of watercolor. Then LEAVE IT ALONE. You must let it sit there, undisturbed, until the paint is dry. In the photos you'll see really chunky salt. I got a little cocky and tried coarse sea salt to see what would happen. It is not my fave. I recommend sticking to regular table salt or finely ground sea salt.
Regardless of what type of salt you use, a little magic happens when you drop the salt on the wet paint. It sits there and soaks up the color in that area, leaving behind lighter spots. Play around with the technique and you'll start to get a feel for it and be able to control your results a little more.
After the paint is completely dry, brush the salt off. You might have to get a little aggressive, but it should all brush off without damaging the paper.
Step 5: Once your card is dry, it's time to get started on the best part: glitter. Write your message or draw a simple design on the front of your card in glue. The text above was written in Elmer's Glue-All, but it doesn't give much control and the glue is a bit runny. I got better results using Aleen's Tacky Glue, which I painted on with a small brush.
Step 6: Fold a large piece of scrap paper in half to form a crease. Smooth it flat and place your valentine card on top, glue side up. The paper will catch excess glitter and the crease makes it easy to pour the glitter back into its container.
Now start dumping glitter on top! Jiggle it around to make sure all of the glue is coated, then shake off the excess on your creased paper. Let dry and voila! You have a fabulous, glittery token of your love with which to impress your valentine.
The best part of this handmade valentine project is that it can be as simple as a lone heart on a colorful background, or you can get a little more complicated and have fun with different patterns, colors, etc. I decided to make one with sparkly clouds raining down hearts and accented it with gold Sharpie.
Whatever you do on the front, don't forget to open it up and write a heartfelt note inside. Happy Valentine's Day, y'all!
xoxo, Carolyn


Hey lady. This is super chainlettery, but! let's go with it. I've nominated you for a Leibster Award. Because I can. I hope this makes you happy.
ReplyDeletehttp://whatisthisicanteven.wordpress.com/2013/03/05/the-liebster-awards-like-a-chain-letter-but-better-for-my-ego/